> ## Documentation Index
> Fetch the complete documentation index at: https://docs.inworld.ai/llms.txt
> Use this file to discover all available pages before exploring further.
# Multimodal Companion
The Real-time Multimodal Companion Template demonstrates how to build an AI companion that combines speech-to-text, image understanding, and text-to-speech through WebSocket communication. This template includes both a Node.js server and a Unity client for a complete real-time interactive experience.
Key concepts demonstrated:
* Speech-to-text (STT)- Voice input processing with VAD-based segmentation
* Multimodal image chat - Combined text and image understanding
* Text-to-speech (TTS) - Streaming audio response generation
* WebSocket communication - Real-time bidirectional data exchange
* Unity integration - Full client implementation for mobile/desktop
## Overview
The Multimodal Companion consists of two main components:
1. **Node.js Server** - Handles WebSocket connections, processes audio/text/image inputs, and manages graph executions
2. **Unity Client** - Provides the user interface for capturing audio, images, and displaying responses
The server uses the Inworld Agent Runtime SDK to create processing graphs that:
* Convert speech-to-text using VAD for segmentation
* Process text and images through LLM models
* Generate speech responses via TTS
* Stream results back to the client in real-time
## Prerequisites
* Node.js 20+ and TypeScript 5+
* Unity 2017+ (for full client experience)
* Inworld Agent Runtime SDK v0.8 (installed automatically via package.json)
## Run the Template
You have two options for running this template:
### Option 1: Run the Node.js server with Test Pages
Use the built-in HTML test pages for rapid prototyping and testing of the Node.js Server functionality without Unity.
1. Clone the server repository
```bash bash theme={"system"}
git clone https://github.com/inworld-ai/multimodal-companion-node
cd runtime-multimodal-companion-node
```
2. In the root directory, copy `.env-sample` to `.env` and set the required values:
```env .env theme={"system"}
# INWORLD_API_KEY is required
INWORLD_API_KEY=
# ALLOW_TEST_CLIENT is optional, set to true to enable testing via web brower.
ALLOW_TEST_CLIENT=
# VAD_MODEL_PATH is optional, defaults to packaged https://github.com/snakers4/silero-vad
VAD_MODEL_PATH=./silero_vad.onnx
# LLM_MODEL_NAME is optional, defaults to `gpt-4o-mini`
LLM_MODEL_NAME=
# LLM_PROVIDER is optional, defaults to `openai`
LLM_PROVIDER=
# VOICE_ID is optional, defaults to `Dennis`
VOICE_ID=
# TTS_MODEL_ID is optional, defaults to `inworld-tts-1.5-mini`
TTS_MODEL_ID=
# If enabled, it will be saved in system tmp folder.
# Path will be printed in CLI on application start.
# Default value is `false`, set `true` to enable this feature
GRAPH_VISUALIZATION_ENABLED=
```
* `INWORLD_API_KEY`: Your Base64 [Runtime API key](/node/authentication#runtime-api-key)
* `VAD_MODEL_PATH`: Path to your VAD model file (the repo includes the VAD model at `silero_vad.onnx`)
* `ALLOW_TEST_CLIENT`: Must be `true` to enable test pages
3. Install and start the server:
```bash bash theme={"system"}
yarn install
yarn build
yarn start
```
You should see:
```bash theme={"system"}
VAD client initialized
STT Graph initialized
Server running on http://localhost:3000
WebSocket available at ws://localhost:3000/ws?key=
```
4. Test the functionality:
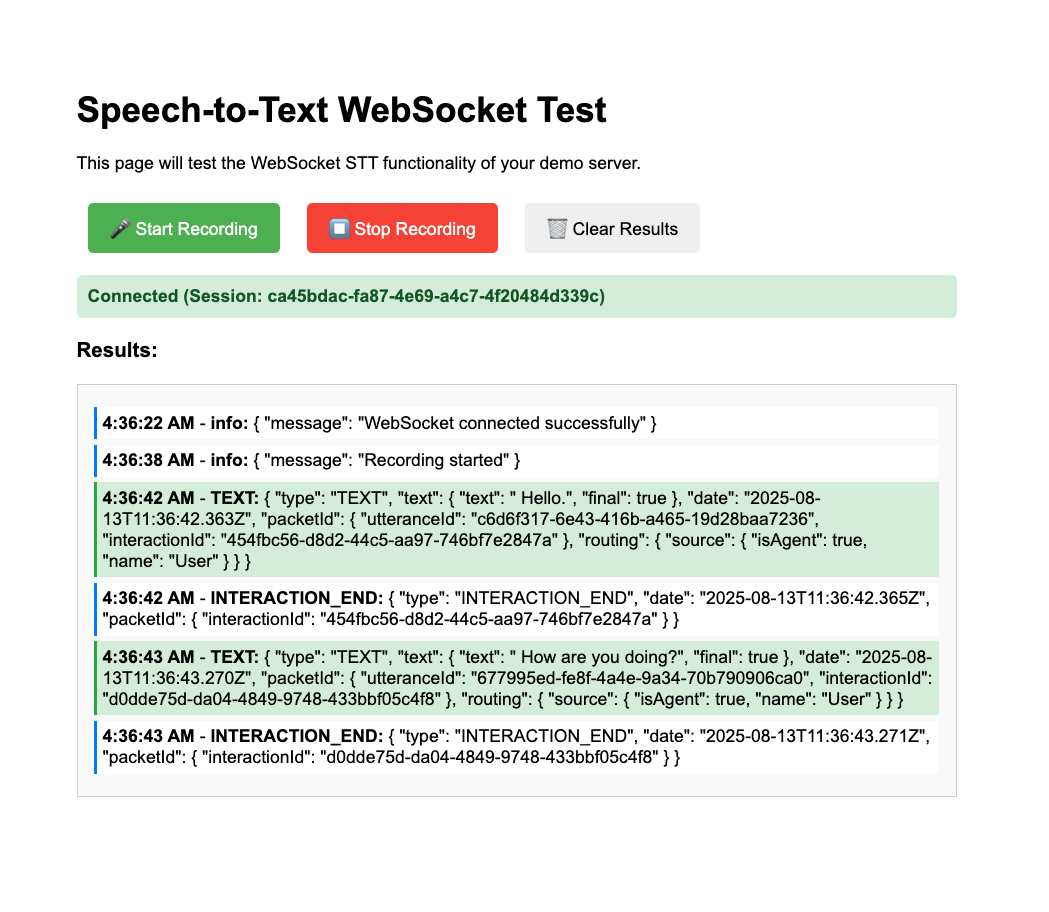
* **Audio interface**: `http://localhost:3000/test-audio`
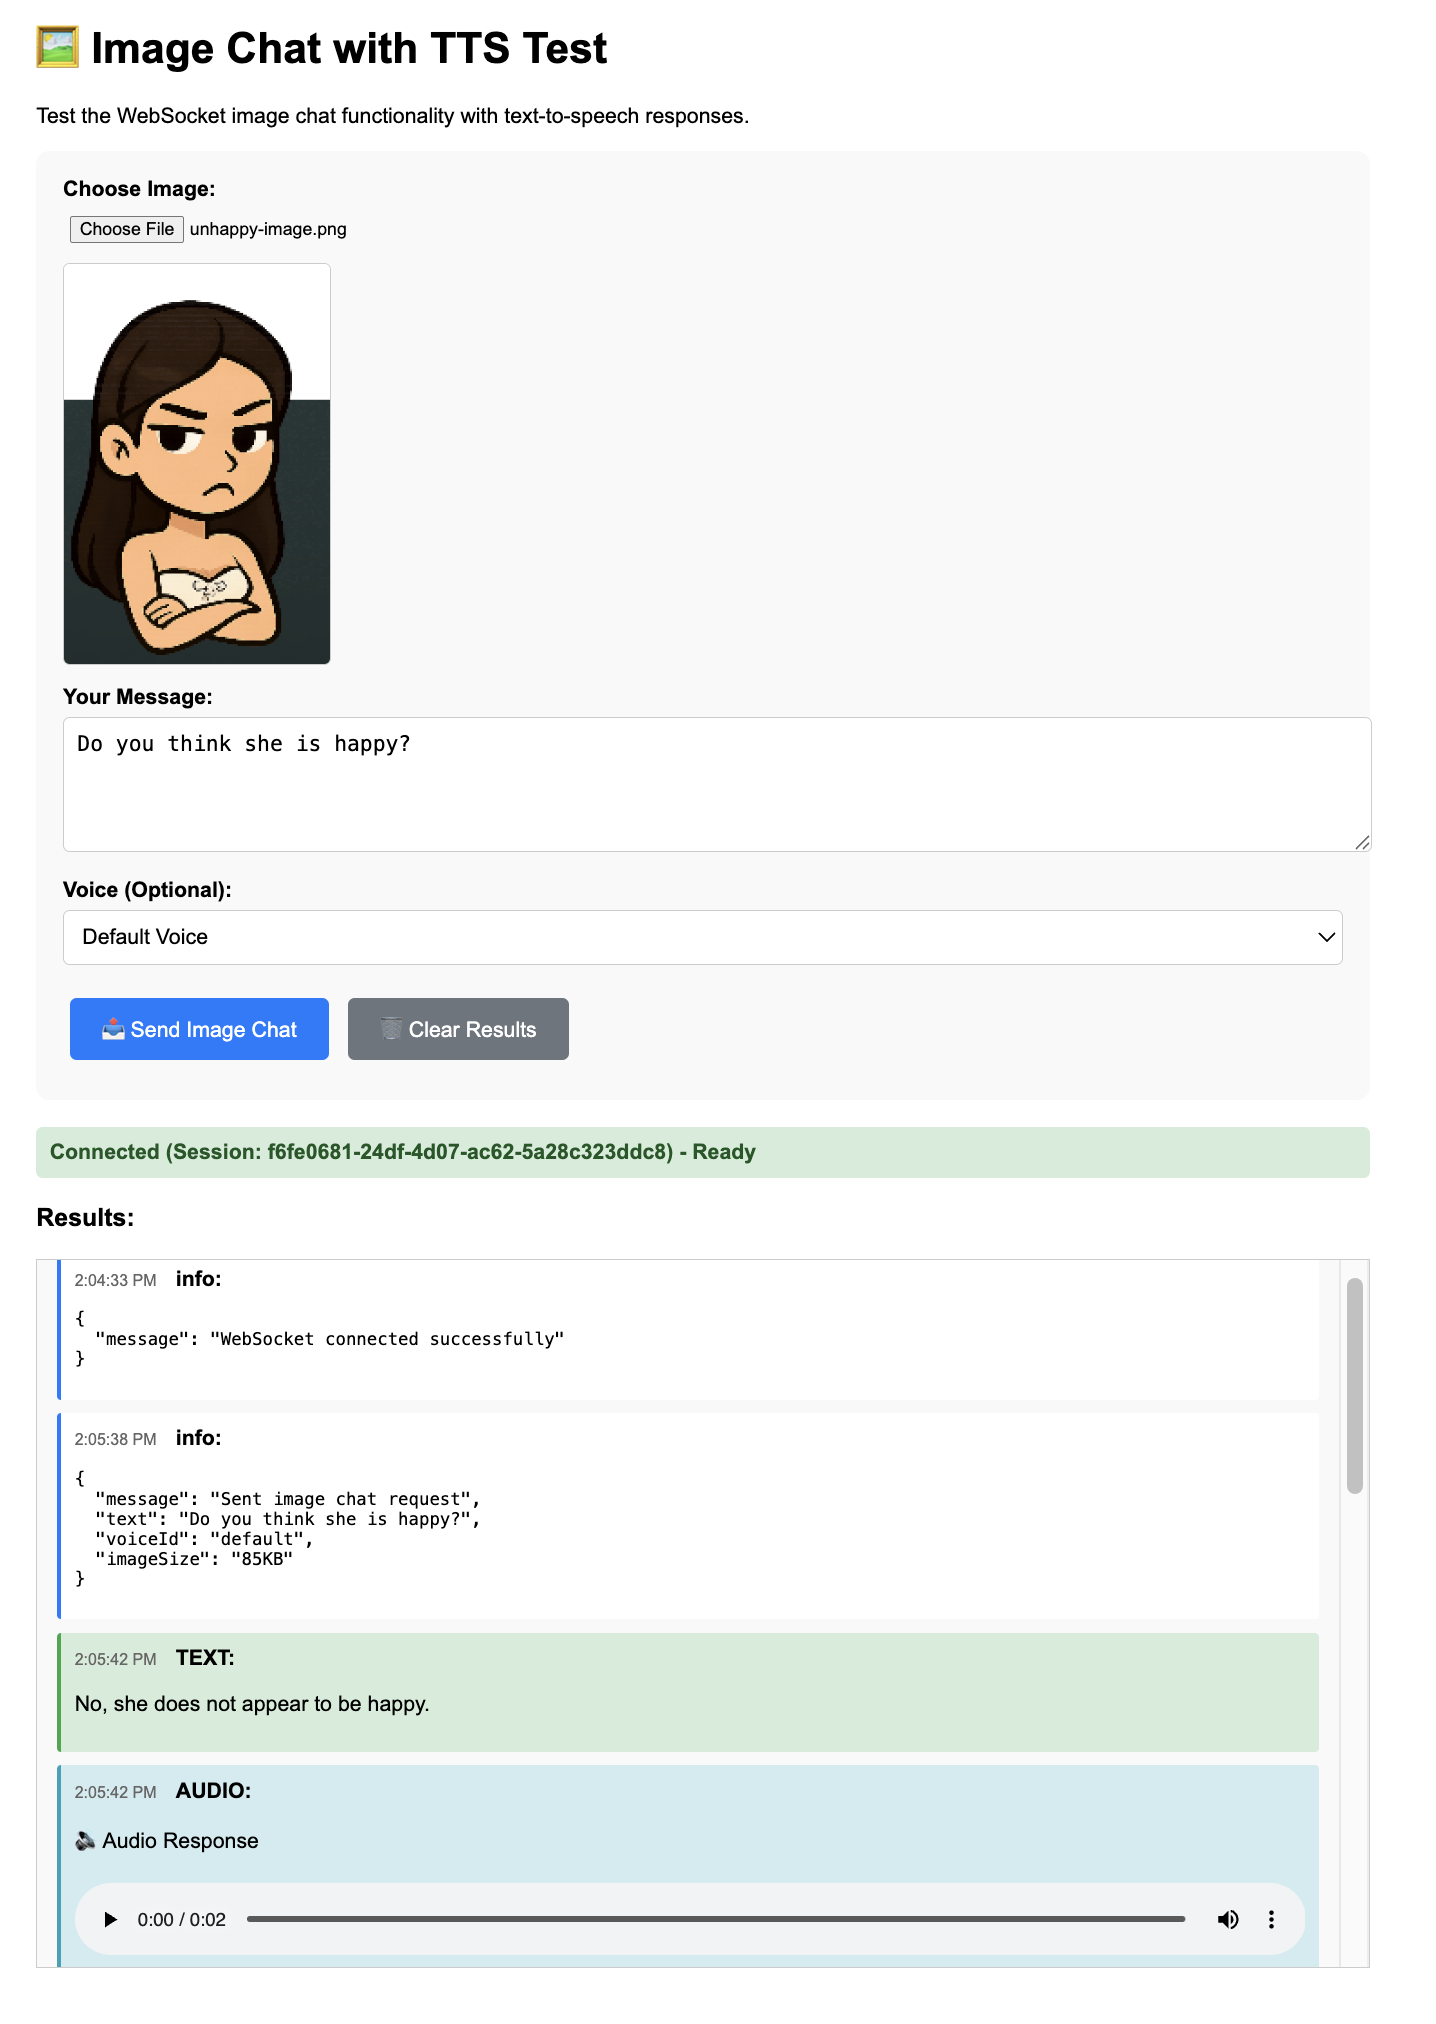
* **Multimodal interface**: `http://localhost:3000/test-image`
The test endpoints require `ALLOW_TEST_CLIENT=true`. Never enable this in production.
### Option 2: Run the full application with Unity client
For the complete multimodal companion experience with a proper UI:
1. Set up your workspace
```bash theme={"system"}
mkdir multimodal-companion-app
cd multimodal-companion-app
```
2. Clone both the Node server repo and the Unity client repo.
```bash theme={"system"}
# Server
git clone https://github.com/inworld-ai/multimodal-companion-node
# Unity client
git clone https://github.com/inworld-ai/runtime-multimodal-companion-unity
```
3. Start the server:
a. Navigate to `runtime-multimodal-companion-node`.
b. Copy `.env-sample` to `.env` and set the required values:
```env .env theme={"system"}
# Required, Inworld Agent Runtime Base64 API key
INWORLD_API_KEY=
# Required, path to VAD model file
VAD_MODEL_PATH=assets/models/silero_vad.onnx
# Optional, defaults to 3000
PORT=3000
# Enable test client endpoints for development
ALLOW_TEST_CLIENT=false
```
* `INWORLD_API_KEY`: Your Base64 [Runtime API key](/node/authentication#runtime-api-key)
* `VAD_MODEL_PATH`: Path to your VAD model file (the repo includes the VAD model at `silero_vad.onnx`)
* `ALLOW_TEST_CLIENT`: Set to `false` to disable test pages (not needed with Unity client).
c. Install and start the server:
```bash bash theme={"system"}
yarn install
yarn build
yarn start
```
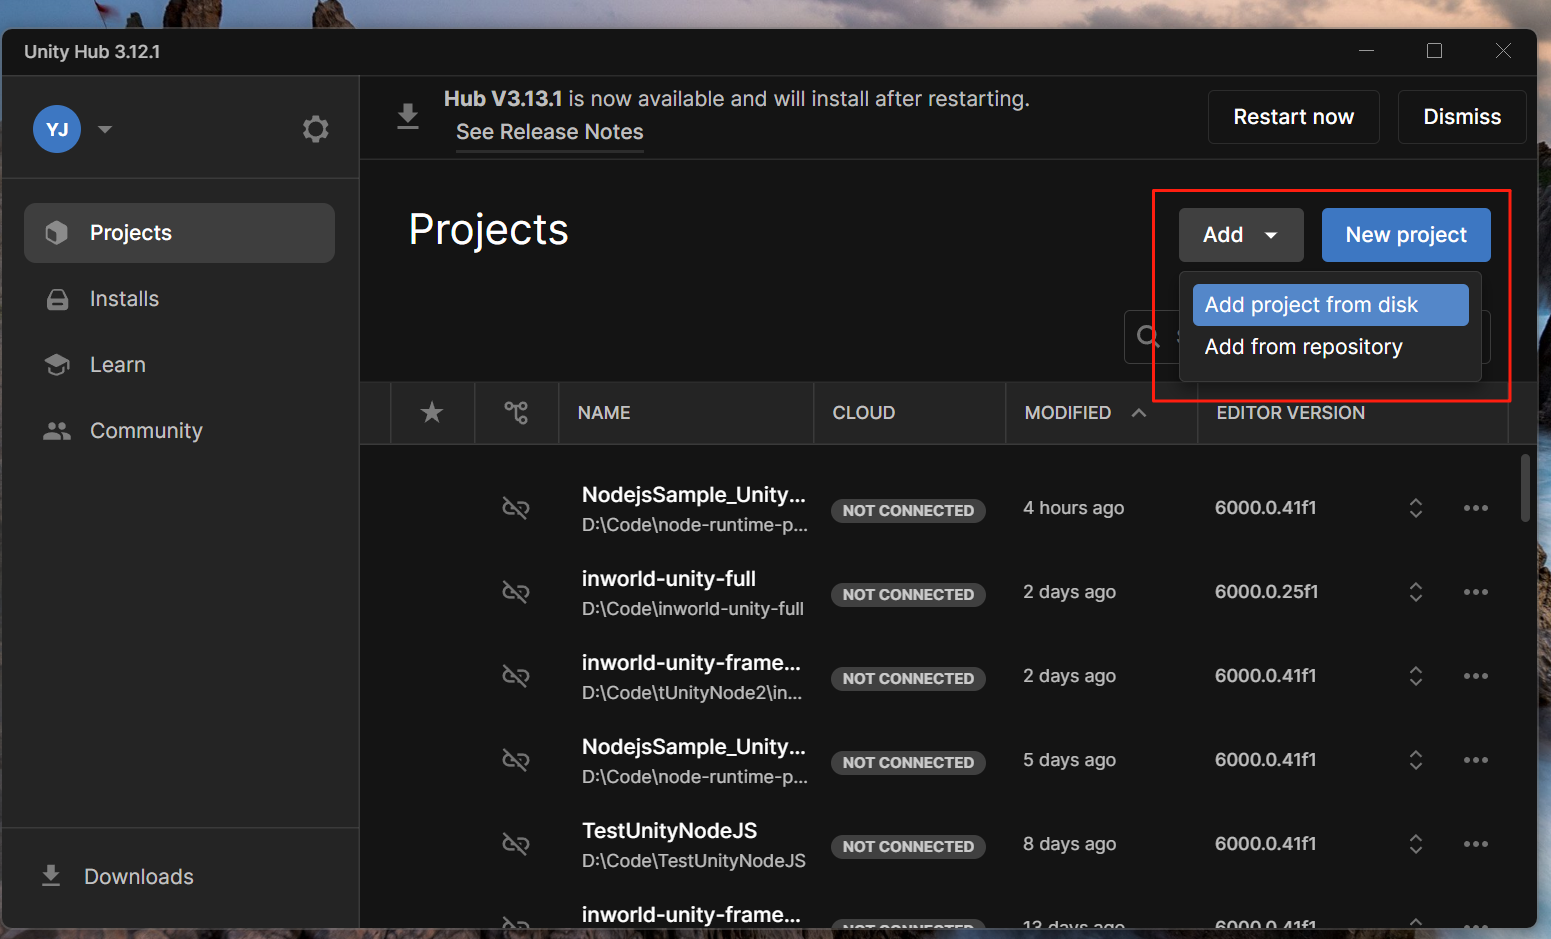
4. Now, configure the Unity client:
a. Open Unity Hub and click **Add** → **Add project from disk**
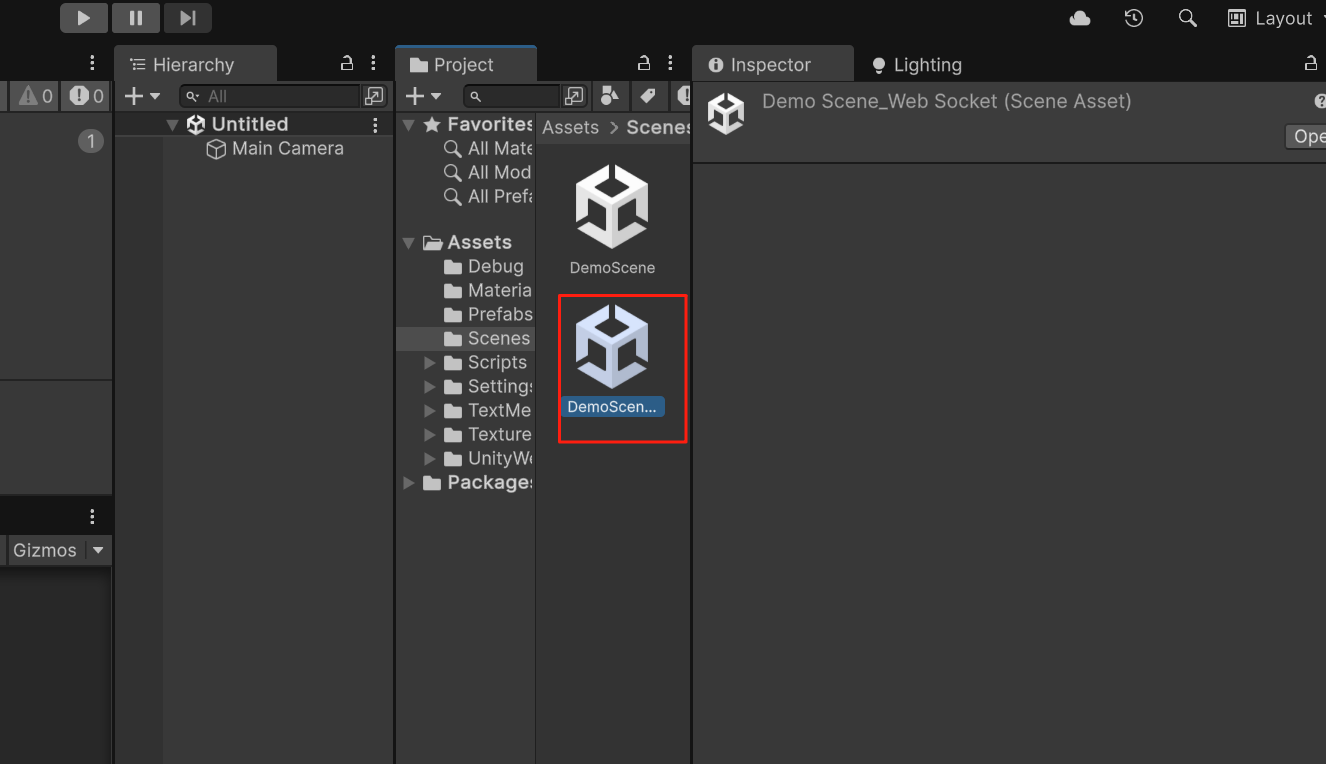
b. Select the `NodejsSample_UnityProject` folder inside `runtime-multimodal-companion-unity`
c. Open the scene `DemoScene_WebSocket`
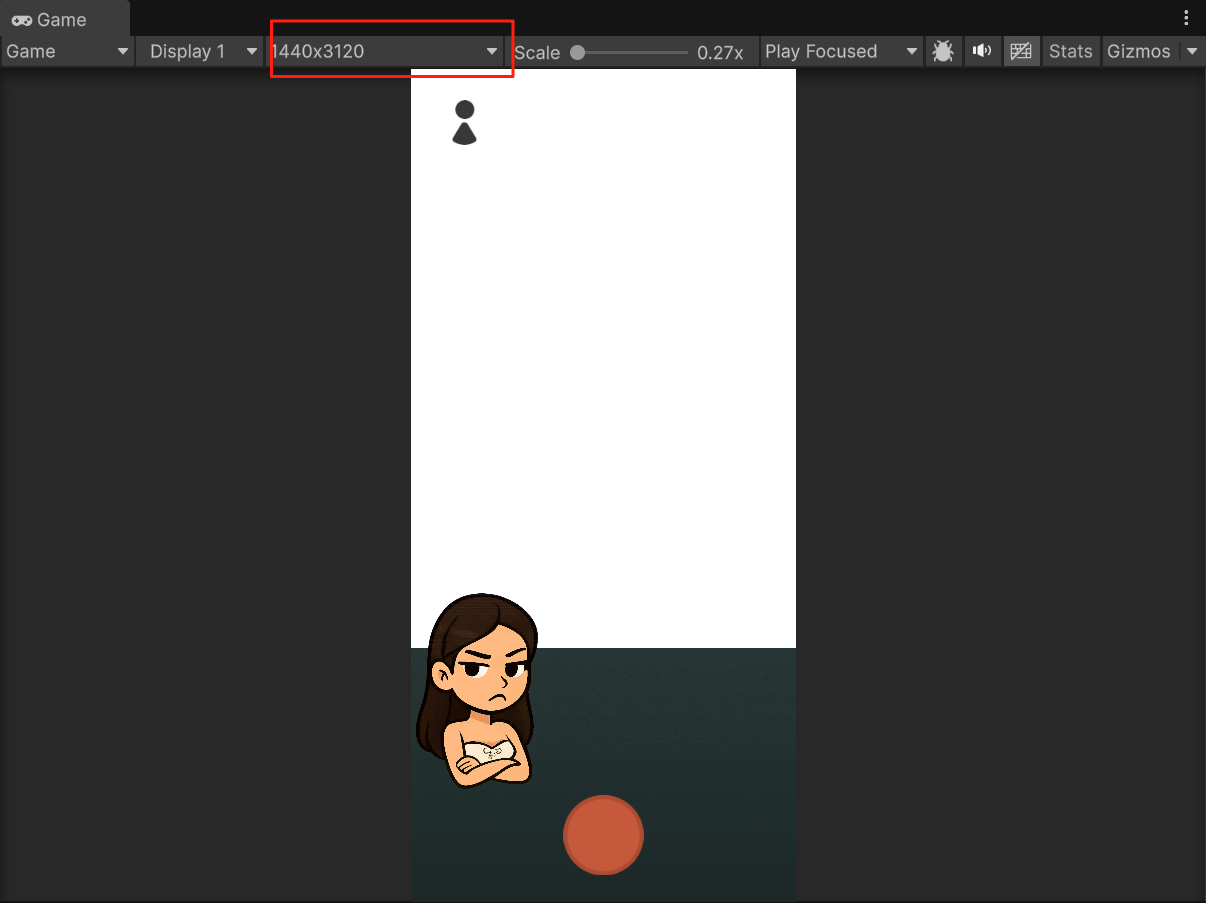
d. Set Game view to **1440 x 3120**
e. Select **AppManager** GameObject and configure **AppManager\_WS**:
* **HTTP URL**: `http://localhost:3000`
* **WebSocket URL**: `ws://localhost:3000`
* **API Key** and **API Secret**: Your Inworld JWT credentials (see [Authentication](/node/authentication))
5. Run the application
* Click **Play** in Unity
* **Hold** record button to capture audio, **release** to send
* The app connects to your Node.js server for real-time interactions
## Understanding the Template
The Multimodal Companion uses a sophisticated graph-based architecture to process multiple input types and generate appropriate responses.
### Message Flow
1. **Client Connection**
* Unity client authenticates and receives session token
* WebSocket connection established with session key
2. **Input Processing**
* **Voice**: Audio chunks → VAD → STT Graph → Text
* **Text**: Direct text input → LLM processing
* **Image+Text**: Combined multimodal input → LLM → TTS
3. **Response Generation**
* Text responses streamed as they're generated
* Audio synthesized in chunks for low latency
* All responses include interaction IDs for tracking
### Core Components
#### 1. Speech Processing Pipeline
The STT graph uses Voice Activity Detection (VAD) to segment speech:
```javascript theme={"system"}
// VAD processes incoming audio to detect speech boundaries
const vadResult = await this.vadClient.detectVoiceActivity(
audioChunk,
SPEECH_THRESHOLD
);
// When speech ends, trigger STT processing
if (speechDuration > MIN_SPEECH_DURATION_MS) {
await this.processCapturedSpeech(key, interactionId);
}
```
#### 2. Multimodal Processing
For image+text inputs, the system creates a streaming pipeline:
```javascript theme={"system"}
// Build pipeline: LLM -> TextChunking -> TTS
const graph = new GraphBuilder({ id: 'image-chat-tts', apiKey })
.addNode(llmNode) // Process text+image
.addNode(textChunkingNode) // Chunk for streaming
.addNode(ttsNode) // Generate speech
.addEdge(llmNode, textChunkingNode)
.addEdge(textChunkingNode, ttsNode)
.build();
```
#### 3. Custom Nodes
The template demonstrates creating custom nodes for specialized processing:
```javascript theme={"system"}
class AudioFilterNode extends CustomNode {
process(_context: ProcessContext, input: AudioInput): GraphTypes.Audio {
return new GraphTypes.Audio({
data: input.audio.data,
sampleRate: input.audio.sampleRate,
});
}
}
```
#### 4. WebSocket Protocol
Messages follow a structured format:
**Client → Server:**
* `{ type: "text", text: string }`
* `{ type: "audio", audio: number[][] }`
* `{ type: "audioSessionEnd" }`
* `{ type: "imageChat", text: string, image: string, voiceId?: string }`
**Server → Client:**
* `TEXT`: `{ text: { text, final }, routing: { source } }`
* `AUDIO`: `{ audio: { chunk: base64_wav } }`
* `INTERACTION_END`: Signals completion
* `ERROR`: `{ error: string }`
### Graph Execution Strategy
The template uses different execution strategies for optimal performance:
1. **STT Graph**: Single shared executor for all connections (fast first token)
2. **Image Chat Graph**: Per-connection executor with voice-specific configuration
3. **Queue Management**: Serialized processing per connection to prevent conflicts
### Error Handling
The system implements robust error recovery:
* **gRPC Deadline Exceeded**: Automatic retry once
* **HTTP/2 GOAWAY**: Rebuild executor on next use
* **WebSocket Disconnection**: Client auto-reconnect with backoff
## Configuration Options
### Model Providers
Configure LLM providers in the code:
```javascript theme={"system"}
// OpenAI
{ provider: 'openai', modelName: 'gpt-4o-mini', stream: true }
// Google Gemini
{ provider: 'google', modelName: 'gemini-2.5-flash-lite', stream: true }
```
### Text Generation Settings
Adjust generation parameters in `constants.ts`:
* `temperature`: Output randomness (0-1)
* `topP`: Nucleus sampling threshold
* `maxNewTokens`: Response length limit
* Various penalties for repetition control
### Audio Settings
* Input sample rate: 16 kHz (Unity microphone)
* VAD model: Silero ONNX
* Pause threshold: Configurable in `PAUSE_DURATION_THRESHOLD_MS`
## Deployment Considerations
### Production Setup
1. Disable test endpoints: `ALLOW_TEST_CLIENT=false`
2. Implement proper authentication for WebSocket connections
3. Use environment-specific configuration
4. Set appropriate concurrency limits (2-4 for basic plans)
### Performance Optimization
* Reuse graph executors across requests
* Implement connection pooling
* Monitor memory usage with long-running executors
* Handle GOAWAY errors gracefully
## Next Steps
* Extend with additional input modalities (video, documents)
* Implement conversation history and context management
* Add custom voice cloning or style transfer
* Integrate with external services and APIs
 * **Multimodal interface**: `http://localhost:3000/test-image`
 b. Select the `NodejsSample_UnityProject` folder inside `runtime-multimodal-companion-unity`
c. Open the scene `DemoScene_WebSocket`
b. Select the `NodejsSample_UnityProject` folder inside `runtime-multimodal-companion-unity`
c. Open the scene `DemoScene_WebSocket`
 d. Set Game view to **1440 x 3120**
 e. Select **AppManager** GameObject and configure **AppManager\_WS**:
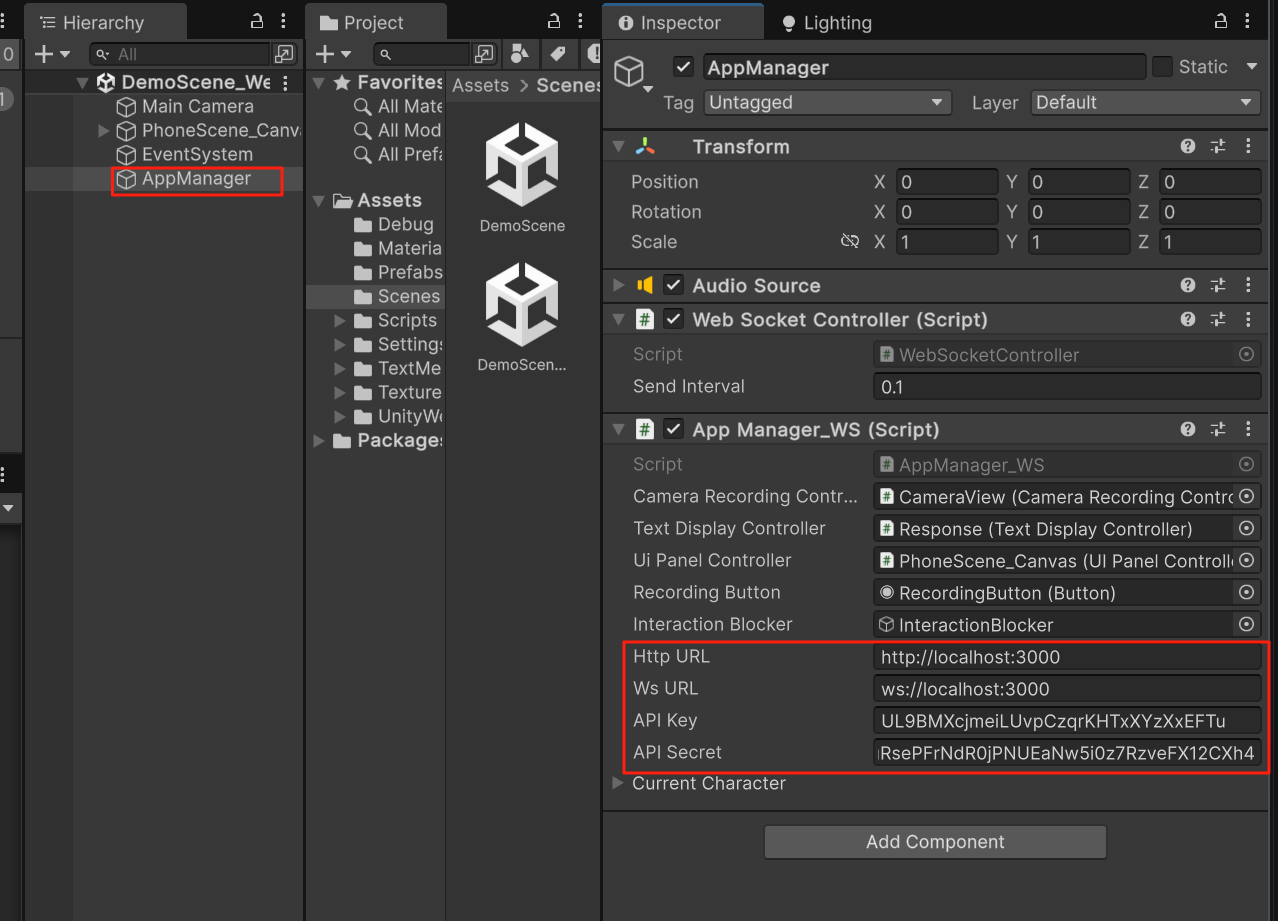 * **HTTP URL**: `http://localhost:3000`
* **WebSocket URL**: `ws://localhost:3000`
* **API Key** and **API Secret**: Your Inworld JWT credentials (see [Authentication](/node/authentication))
* **HTTP URL**: `http://localhost:3000`
* **WebSocket URL**: `ws://localhost:3000`
* **API Key** and **API Secret**: Your Inworld JWT credentials (see [Authentication](/node/authentication))
 5. Run the application
* Click **Play** in Unity
* **Hold** record button to capture audio, **release** to send
* The app connects to your Node.js server for real-time interactions
## Understanding the Template
The Multimodal Companion uses a sophisticated graph-based architecture to process multiple input types and generate appropriate responses.
### Message Flow
1. **Client Connection**
* Unity client authenticates and receives session token
* WebSocket connection established with session key
2. **Input Processing**
* **Voice**: Audio chunks → VAD → STT Graph → Text
* **Text**: Direct text input → LLM processing
* **Image+Text**: Combined multimodal input → LLM → TTS
3. **Response Generation**
* Text responses streamed as they're generated
* Audio synthesized in chunks for low latency
* All responses include interaction IDs for tracking
### Core Components
#### 1. Speech Processing Pipeline
The STT graph uses Voice Activity Detection (VAD) to segment speech:
```javascript theme={"system"}
// VAD processes incoming audio to detect speech boundaries
const vadResult = await this.vadClient.detectVoiceActivity(
audioChunk,
SPEECH_THRESHOLD
);
// When speech ends, trigger STT processing
if (speechDuration > MIN_SPEECH_DURATION_MS) {
await this.processCapturedSpeech(key, interactionId);
}
```
#### 2. Multimodal Processing
For image+text inputs, the system creates a streaming pipeline:
```javascript theme={"system"}
// Build pipeline: LLM -> TextChunking -> TTS
const graph = new GraphBuilder({ id: 'image-chat-tts', apiKey })
.addNode(llmNode) // Process text+image
.addNode(textChunkingNode) // Chunk for streaming
.addNode(ttsNode) // Generate speech
.addEdge(llmNode, textChunkingNode)
.addEdge(textChunkingNode, ttsNode)
.build();
```
#### 3. Custom Nodes
The template demonstrates creating custom nodes for specialized processing:
```javascript theme={"system"}
class AudioFilterNode extends CustomNode {
process(_context: ProcessContext, input: AudioInput): GraphTypes.Audio {
return new GraphTypes.Audio({
data: input.audio.data,
sampleRate: input.audio.sampleRate,
});
}
}
```
#### 4. WebSocket Protocol
Messages follow a structured format:
**Client → Server:**
* `{ type: "text", text: string }`
* `{ type: "audio", audio: number[][] }`
* `{ type: "audioSessionEnd" }`
* `{ type: "imageChat", text: string, image: string, voiceId?: string }`
**Server → Client:**
* `TEXT`: `{ text: { text, final }, routing: { source } }`
* `AUDIO`: `{ audio: { chunk: base64_wav } }`
* `INTERACTION_END`: Signals completion
* `ERROR`: `{ error: string }`
### Graph Execution Strategy
The template uses different execution strategies for optimal performance:
1. **STT Graph**: Single shared executor for all connections (fast first token)
2. **Image Chat Graph**: Per-connection executor with voice-specific configuration
3. **Queue Management**: Serialized processing per connection to prevent conflicts
### Error Handling
The system implements robust error recovery:
* **gRPC Deadline Exceeded**: Automatic retry once
* **HTTP/2 GOAWAY**: Rebuild executor on next use
* **WebSocket Disconnection**: Client auto-reconnect with backoff
## Configuration Options
### Model Providers
Configure LLM providers in the code:
```javascript theme={"system"}
// OpenAI
{ provider: 'openai', modelName: 'gpt-4o-mini', stream: true }
// Google Gemini
{ provider: 'google', modelName: 'gemini-2.5-flash-lite', stream: true }
```
### Text Generation Settings
Adjust generation parameters in `constants.ts`:
* `temperature`: Output randomness (0-1)
* `topP`: Nucleus sampling threshold
* `maxNewTokens`: Response length limit
* Various penalties for repetition control
### Audio Settings
* Input sample rate: 16 kHz (Unity microphone)
* VAD model: Silero ONNX
* Pause threshold: Configurable in `PAUSE_DURATION_THRESHOLD_MS`
## Deployment Considerations
### Production Setup
1. Disable test endpoints: `ALLOW_TEST_CLIENT=false`
2. Implement proper authentication for WebSocket connections
3. Use environment-specific configuration
4. Set appropriate concurrency limits (2-4 for basic plans)
### Performance Optimization
* Reuse graph executors across requests
* Implement connection pooling
* Monitor memory usage with long-running executors
* Handle GOAWAY errors gracefully
## Next Steps
* Extend with additional input modalities (video, documents)
* Implement conversation history and context management
* Add custom voice cloning or style transfer
* Integrate with external services and APIs
5. Run the application
* Click **Play** in Unity
* **Hold** record button to capture audio, **release** to send
* The app connects to your Node.js server for real-time interactions
## Understanding the Template
The Multimodal Companion uses a sophisticated graph-based architecture to process multiple input types and generate appropriate responses.
### Message Flow
1. **Client Connection**
* Unity client authenticates and receives session token
* WebSocket connection established with session key
2. **Input Processing**
* **Voice**: Audio chunks → VAD → STT Graph → Text
* **Text**: Direct text input → LLM processing
* **Image+Text**: Combined multimodal input → LLM → TTS
3. **Response Generation**
* Text responses streamed as they're generated
* Audio synthesized in chunks for low latency
* All responses include interaction IDs for tracking
### Core Components
#### 1. Speech Processing Pipeline
The STT graph uses Voice Activity Detection (VAD) to segment speech:
```javascript theme={"system"}
// VAD processes incoming audio to detect speech boundaries
const vadResult = await this.vadClient.detectVoiceActivity(
audioChunk,
SPEECH_THRESHOLD
);
// When speech ends, trigger STT processing
if (speechDuration > MIN_SPEECH_DURATION_MS) {
await this.processCapturedSpeech(key, interactionId);
}
```
#### 2. Multimodal Processing
For image+text inputs, the system creates a streaming pipeline:
```javascript theme={"system"}
// Build pipeline: LLM -> TextChunking -> TTS
const graph = new GraphBuilder({ id: 'image-chat-tts', apiKey })
.addNode(llmNode) // Process text+image
.addNode(textChunkingNode) // Chunk for streaming
.addNode(ttsNode) // Generate speech
.addEdge(llmNode, textChunkingNode)
.addEdge(textChunkingNode, ttsNode)
.build();
```
#### 3. Custom Nodes
The template demonstrates creating custom nodes for specialized processing:
```javascript theme={"system"}
class AudioFilterNode extends CustomNode {
process(_context: ProcessContext, input: AudioInput): GraphTypes.Audio {
return new GraphTypes.Audio({
data: input.audio.data,
sampleRate: input.audio.sampleRate,
});
}
}
```
#### 4. WebSocket Protocol
Messages follow a structured format:
**Client → Server:**
* `{ type: "text", text: string }`
* `{ type: "audio", audio: number[][] }`
* `{ type: "audioSessionEnd" }`
* `{ type: "imageChat", text: string, image: string, voiceId?: string }`
**Server → Client:**
* `TEXT`: `{ text: { text, final }, routing: { source } }`
* `AUDIO`: `{ audio: { chunk: base64_wav } }`
* `INTERACTION_END`: Signals completion
* `ERROR`: `{ error: string }`
### Graph Execution Strategy
The template uses different execution strategies for optimal performance:
1. **STT Graph**: Single shared executor for all connections (fast first token)
2. **Image Chat Graph**: Per-connection executor with voice-specific configuration
3. **Queue Management**: Serialized processing per connection to prevent conflicts
### Error Handling
The system implements robust error recovery:
* **gRPC Deadline Exceeded**: Automatic retry once
* **HTTP/2 GOAWAY**: Rebuild executor on next use
* **WebSocket Disconnection**: Client auto-reconnect with backoff
## Configuration Options
### Model Providers
Configure LLM providers in the code:
```javascript theme={"system"}
// OpenAI
{ provider: 'openai', modelName: 'gpt-4o-mini', stream: true }
// Google Gemini
{ provider: 'google', modelName: 'gemini-2.5-flash-lite', stream: true }
```
### Text Generation Settings
Adjust generation parameters in `constants.ts`:
* `temperature`: Output randomness (0-1)
* `topP`: Nucleus sampling threshold
* `maxNewTokens`: Response length limit
* Various penalties for repetition control
### Audio Settings
* Input sample rate: 16 kHz (Unity microphone)
* VAD model: Silero ONNX
* Pause threshold: Configurable in `PAUSE_DURATION_THRESHOLD_MS`
## Deployment Considerations
### Production Setup
1. Disable test endpoints: `ALLOW_TEST_CLIENT=false`
2. Implement proper authentication for WebSocket connections
3. Use environment-specific configuration
4. Set appropriate concurrency limits (2-4 for basic plans)
### Performance Optimization
* Reuse graph executors across requests
* Implement connection pooling
* Monitor memory usage with long-running executors
* Handle GOAWAY errors gracefully
## Next Steps
* Extend with additional input modalities (video, documents)
* Implement conversation history and context management
* Add custom voice cloning or style transfer
* Integrate with external services and APIs