Inworld Voice API Setup
Overview
The Inworld Text-to-Speech (TTS) API, or Inworld Voice, allows you to generate high-quality, human-like speech at high speed and low latency, allowing for real-time, natural, and expressive NPC speech. This guide covers how to set up the Inworld TTS system for your project.
Setup
To set up the Inworld Voice API for your project, perform the following steps:
1. Sign Up
First you need an Inworld account.
To set up your Inworld accoount, go to Inworld Studio and follow the onscreen instructions.
2. Obtain API Key
Once in the Inworld Studio, you then need to create a workspace.
To do this, left-click on the Drop-Down Menu in the top-left of the screen.

This opens the Workspaces page.
From this interface, left-click Create New Workspace in the top-right of the interface.

Enter a workspace name into the field provided and press Continue.
A new workspace is then created.
Within this new workspace, left-click on Integrations on the left sidebar.
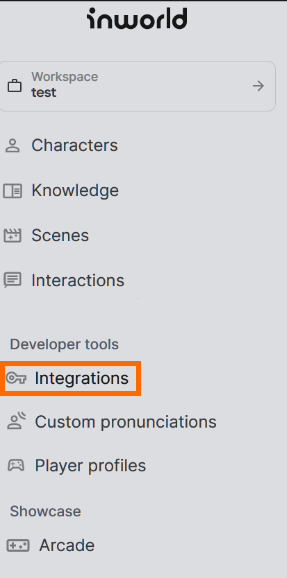
Then, scroll down and press Generate New Key.

A new key is then generated.
One this key has been generated, press Copy Base64.

This key is used to authenticate with the Inworld TTS API.
Whenever needed, the key can be retrieved from this page at any time.
3. Authenticate the API Key
The Inworld TTS API supports both Basic and JWT authentication.
The following workflow steps in this guide cover Basic authentication.
To perform authentication, the API key must be included in the API Request Header, with each call appearing as below by replacing INWORLD_API_KEY with the key copied in Step 2.
![]()
Warning: API Keys are Not Secure
Note that Basic authentication is not considered secure and may leak API keys.
It is recommended that API keys are stored as environment variables and read at run time. It is further recommended that JWT authentication be used where possible.
Both setting and retrieving environment variables, plus using JWT authentication, are out of the scope of this guide, which has a focus on the Inworld API usage only.
4. Making Your First API Call
The first API call you make will be to the ListVoices endpoint. This endpoint returns a list of voices that can be used in future calls.
Reminder: Don’t forget to replace INWORLD_API_KEY with the key generated earlier.
Make the call as follows:
- Curl
- grpc
- python
- javascript
curl --request GET --header "Authorization: Basic $INWORLD_API_KEY" https://api.inworld.ai/tts/v1alpha/voices
grpcurl -vv \
  -H "authorization: Basic $INWORLD_API_KEY" \
  -d '{}' \
  api-engine.inworld.ai:443 \
  ai.inworld.tts.v1alpha.TextToSpeech/ListVoices
import requests

url = 'https://api.inworld.ai/tts/v1alpha/voices'
headers = {
    'Authorization': 'Basic ' + INWORLD_API_KEY
}

response = requests.get(url, headers=headers)

if response.status_code == 200:
    print(response.json())
else:
    print('Request failed with status code:', response.status_code)
const axios = require('axios');

const url = 'https://api.inworld.ai/tts/v1alpha/voices';
const headers = {
  'Authorization': 'Basic ' + INWORLD_API_KEY
};

axios.get(url, { headers })
  .then(response => {
    console.log(response.data);
  })
  .catch(error => {
    console.error(error);
  });
The API then returns a JSON Blob containing a list of voices.
The example below shows the voice for "Timothy."
{
  "voices": [
    ...
    {
      "languageCodes": [
        "en-US"
      ],
      "name": "Timothy",
      "voiceMetadata": {
        "gender": "MALE",
        "age": "TEEN",
        "accent": "ACCENT_UNSPECIFIED"
      },
      "naturalSampleRateHertz": 22050
    },
    ...
  ]
}
In the example for Timothy above, the output has been cut off and replaced with “...” for the sake of concision.
5. Synthesizing Speech
Next, you need to to synthesize some speech by calling the Synthesize endpoint.
Before beginning this step, assure you have replaced INWORLD_API_KEY with your API key covered in Step 2.
Note: The following command assumes you have the commands jq and base64 available to extract the response from the API and convert it into a wav file. These are not necessary to use the API, and are included for instructional purposes so you can record the audio returned by the API and validate the call worked.
Make the call as follows:
- Curl
- grpc
- python
- javascript
curl --request POST \
--header "Authorization: Basic $INWORLD_API_KEY" \
--data '{
  "input": {
    "text": "Hello world"
  },
  "voice": {
    "name": "Timothy"
  }
}' \
https://api.inworld.ai/tts/v1alpha/text:synthesize | jq -r '.result.audioContent' | base64 -d > hello_world.wav
grpcurl -H "authorization: Basic $INWORLD_API_KEY" \
  -d '{
    "input": {
      "text": "Hello everyone! How are you all doing today, good?"
    },
    "voice": {
      "name": "Timothy"
    }
  }' \
  api-engine.inworld.ai:443 \
  ai.inworld.tts.v1alpha.TextToSpeech/SynthesizeSpeech  | jq -r '.audioContent' | base64 -d > output.wav
import requests
import json
import base64
import io
import simpleaudio as sa
import os

url = 'https://api.inworld.ai/tts/v1alpha/text:synthesize'
api_key = INWORLD_API_KEY

headers = {
    'Authorization': 'Basic ' + api_key,
    'Content-Type': 'application/json'
}

payload = {
    'input': {
        'text': 'Hello world'
    },
    'voice': {
        'name': 'Timothy'
    }
}

response = requests.post(url, headers=headers, data=json.dumps(payload))
response_data = response.json()

audio_content = response_data['result']['audioContent']

# Decode the base64-encoded audio content
audio_data = base64.b64decode(audio_content)

# Create a WAV file in memory from the audio data
wav_file = io.BytesIO()
wav_file.write(audio_data)

# Rewind the WAV file
wav_file.seek(0)

# Load the WAV file using simpleaudio
wave_obj = sa.WaveObject.from_wave_file(wav_file)

# Play the audio
play_obj = wave_obj.play()
play_obj.wait_done()

print('Audio playback complete.')
const axios = require('axios');

const apiKey = INWORLD_API_KEY; // Replace with your InWorld API key
const url = 'https://api.inworld.ai/tts/v1alpha/text:synthesize';

const requestData = {
  input: {
    text: 'Hello world'
  },
  voice: {
    name: 'Timothy'
  }
};

axios.post(url, requestData, {
  headers: {
    Authorization: `Basic ${apiKey}`
  }
})
  .then(response => {
    console.log('Response:', response.data);
    // Play or store the audio here
  })
  .catch(error => {
    console.error('Error:', error.response.data);
    // Handle the error here
  });
The Synthesize endpoint supports response streaming by default. If response streaming is not required, you can also use the Synthesize-Sync endpoint:
6. Finished
You are now able to authenticate against and use the Inworld TTS API.