Goals Showcase
This showcase focuses on using goals with Unreal. There are three demos in this showcase and a video for each:
- Enabling and disabling goals with intent recognition.
- Dynamic data retrieval with entities and parameters.
- Character core description and motivation mutations.
Enabling and Disabling Goals with Intents
You can follow the written tutorial below or watch this video:
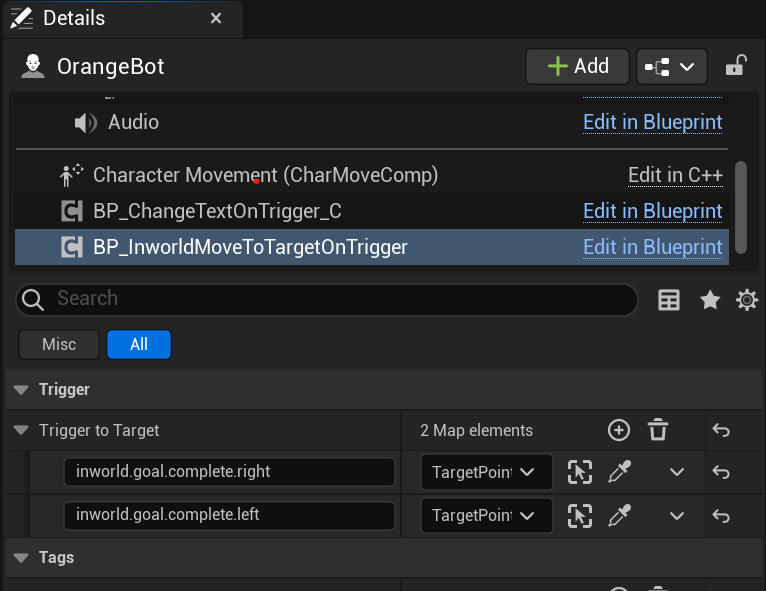
The robot will walk left or right upon command but only after the player says hello. Just like in the trigger demo, the robot has a BP_InworldMoveToTargetOnTrigger component that will react to the trigger and move the character when a trigger is received.
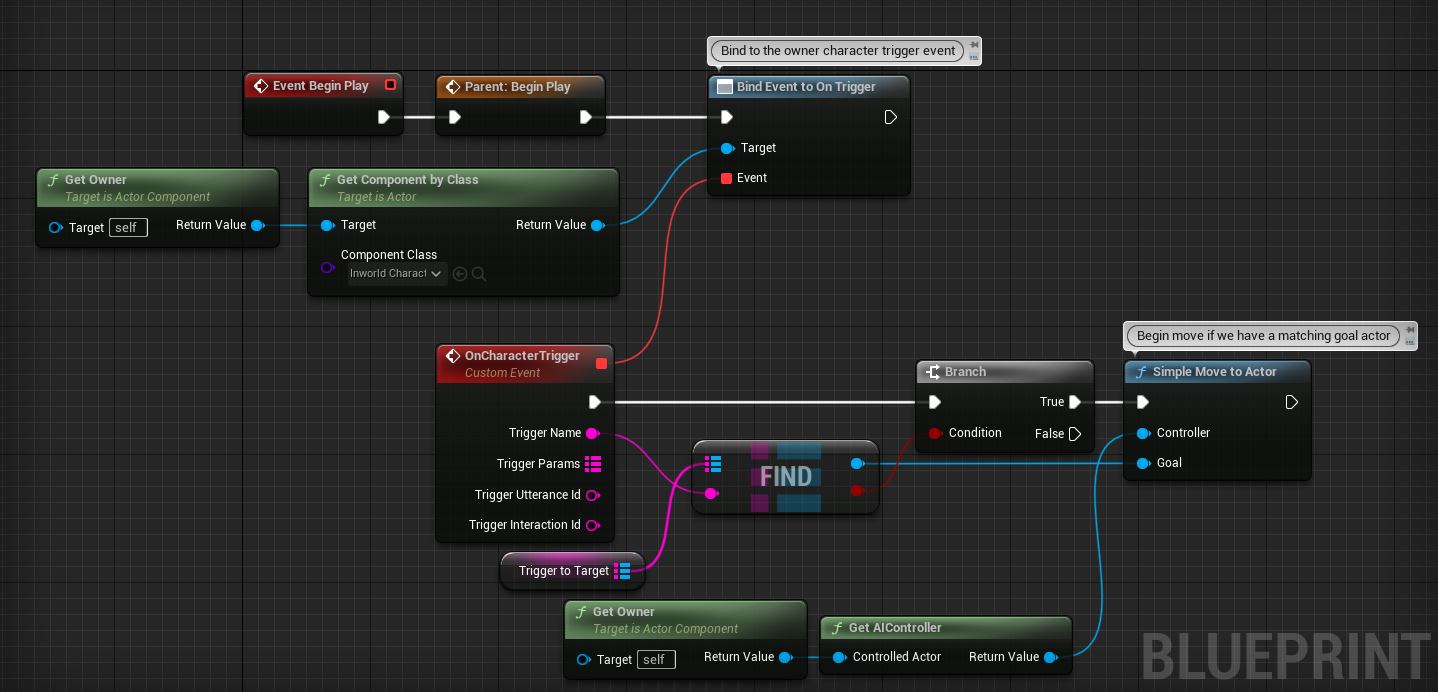
The Trigger to target map is setup using the left or right goal completion triggers.
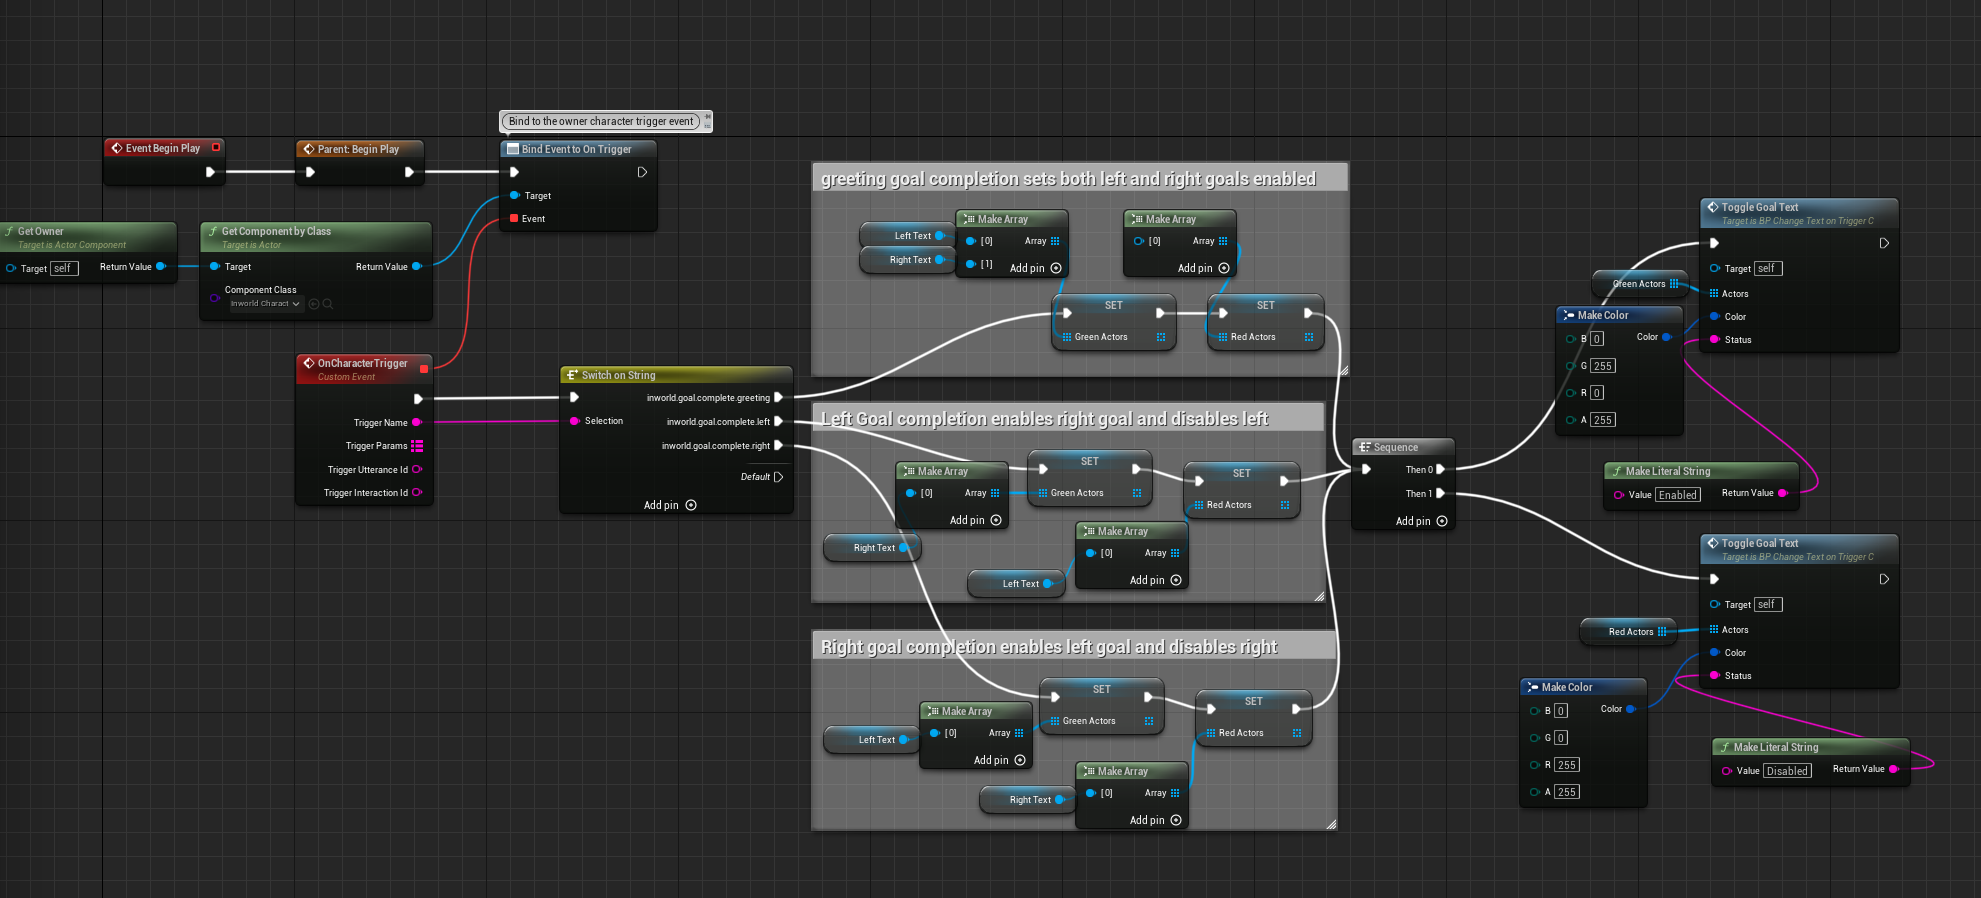
Additionally there is a new BP_ChangeTextOnTrigger_C component that will change and colorize the Left and Right Disabled/Enabled text on the screen. To illustrate both techniques, when receiving the trigger here, we simply switch on string and change the text accordingly to match the goal state in the program flow as set up in our studio YAML.
In Inworld Studio, this character has a set of intents set up both for left and right, as well greeting.
intents:
  - name: "greeting"
    training_phrases:
      - "Hello"
      - "Hi"
      - "Hey"
      - "Hi there"
      - "Greetings"
      - "Howdy"
      - "Hey there"
      - "Hiya"
      - "Sup"

  - name: "left"
    training_phrases:
      - "left"
      - "walk left"
      - "go left"
      - "head left"

  - name: "right"
    training_phrases:
      - "right"
      - "walk right"
      - "go right"
      - "head right"
The left and right goals are disabled until the player says hello and the greeting goal is completed.
Additionally to keep the character from responding incorrectly when the left or right goals are disabled, there is a left_disabled and right_disabled goals to catch the left or right intents.
When the left goal is completed, a trigger of inworld.goal.complete.left is sent to Unreal and our character component blueprints will receive and react accordingly.
goals:
  - name: "greeting"
    activation:
      intent: "greeting"
    actions:
      - instruction: "greet {player} and ask if they would like you to walk left or right."
        character_changes:
           enable_goals:
            - "left"
            - "right"
           disable_goals:
             - "left_disabled"
             - "right_disabled"

  - name: "left"
    enabled_by_default: false
    repeatable: true
    activation:
      intent: "left"
    actions:
      - say_verbatim: "I will head left."
        character_changes:
           enable_goals:
            - "right"
            - "left_disabled"
           disable_goals:
            - "left"
            - "right_disabled"

  - name: "right"
    enabled_by_default: false
    repeatable: true
    activation:
      intent: "right"
    actions:
      - say_verbatim: "I will head right."
        character_changes:
           enable_goals:
            - "left"
            - "right_disabled"
           disable_goals:
            - "right"
            - "left_disabled"

  - name: "left_disabled"
    enabled_by_default: true
    repeatable: true
    activation:
      intent: "left"
    actions:
      - say_verbatim: "I'm sorry I can't walk left."

  - name: "right_disabled"
    enabled_by_default: true
    repeatable: true
    activation:
      intent: "right"
    actions:
      - say_verbatim: "I'm sorry I can't walk right."
Dynamic Data Retrieval with Entities and Parameters
You can follow the written tutorial below or watch this video:
The player can ask the robot to fetch the population of a city and the robot will reply with current data it receives at runtime from an external API.
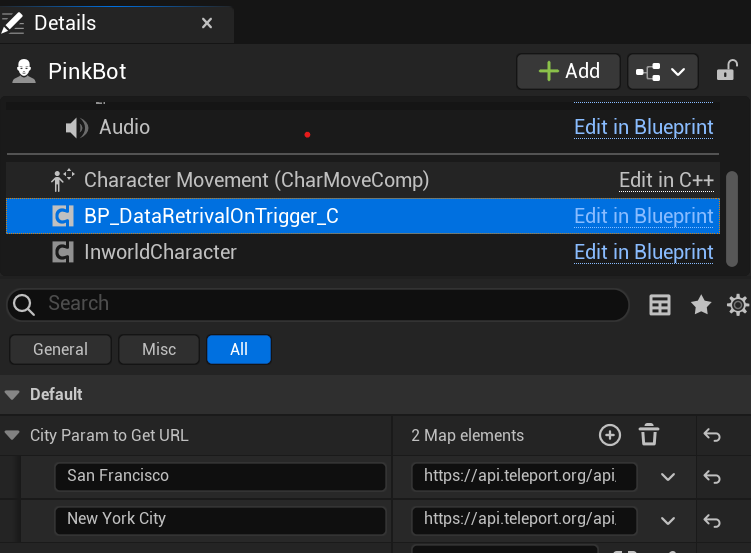
When data is requested, a trigger is received in Unreal on the robot's character component BP_DataRetrievalOnTrigger_C which will do an HTTP GET Request to an external API (specified in the level blueprint on the same character component's CityParamtoGetURL map variable) to retrieve the current population of the city. Note, once the trigger is received any method for data retrieval can be used.
Once the data is retrieved, the population data is sent back to the inworld character with another trigger named provide_population in its population parameter, and the character will relay the information back to the player.
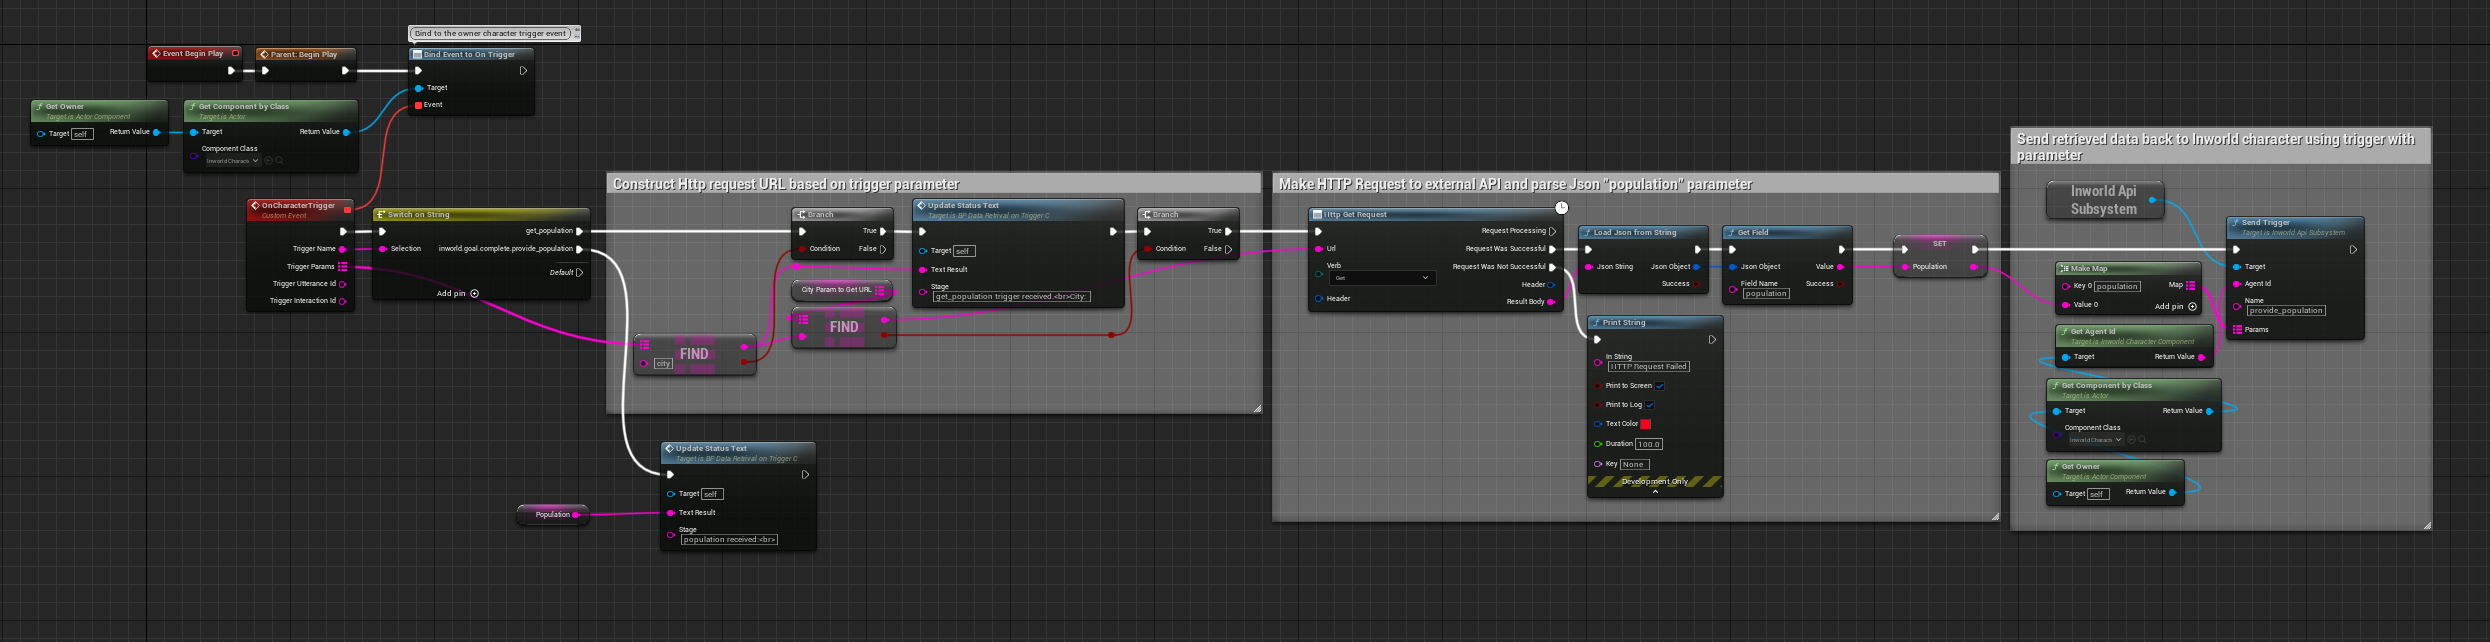
In the goals section of inworld studio, the city entity is defined to allow one of the cities specified in the entity's value entries to complete the population_in_city intent. Note that if specified, synonyms are the phrases the inworld brain will recognize and match to specific entity map entry. If they are not specified, value will be used. In this example, synonyms are important since the specific city names have spaces and will not match correctly just with value without being specified.
  - name: "population_in_city"
    training_phrases:
      - "What's the population of "
      - "What is the population of "
      - "population in"
      - "population of"

entities:
  - name: "city"
    map_entries:
      - value: "san_francisco"
        display_name: "San Francisco"
        synonyms:
          - "sf"
          - "san francisco"
      - value: "new_york"
        display_name: "New York City"
        synonyms:
          - "nyc"
          - "new york"
          - "new york city"
When the population_in_city intent is recognized, the robot will send a trigger called get_population with the parameter city and the value of the specific city asked for, either san francisco or new york (as defined by entity entries in the goals YAML).
The data is returned with the provide_population trigger and placed into an instruction for the character with the {{p.population}} parameter. Note, {{p.city}} was previously sent so there is no need to return that data from Unreal in order to access it in future goals.
  - name: "get_population_goal"
    repeatable: true
    activation:
      intent: "population_in_city"
    actions:
      - send_trigger: "get_population"
        trigger_params: [city]

  - name: "provide_population"
    repeatable: true
    activation:
      trigger: "provide_population"
    actions:
      - instruction: "tell {player} the population of {{p.city}} is {{p.population}}."
Core Description character mutations using Goals and triggers
You can follow the written tutorial below or watch this video:
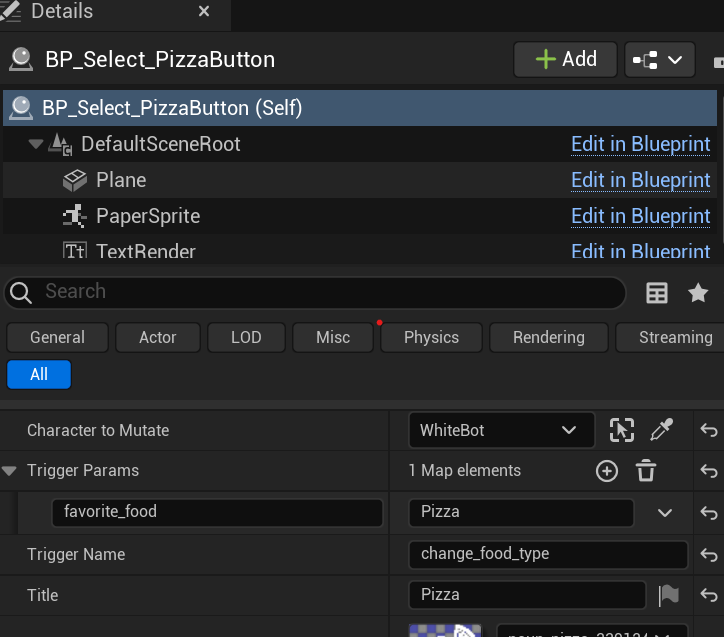
You can ask the robot about its favorite food (yes robots can eat too) and they will respond talk all about chocolate. Clicking the button actors on the right will send a trigger to mutate the robot's core description and motivation to change their favorite food.
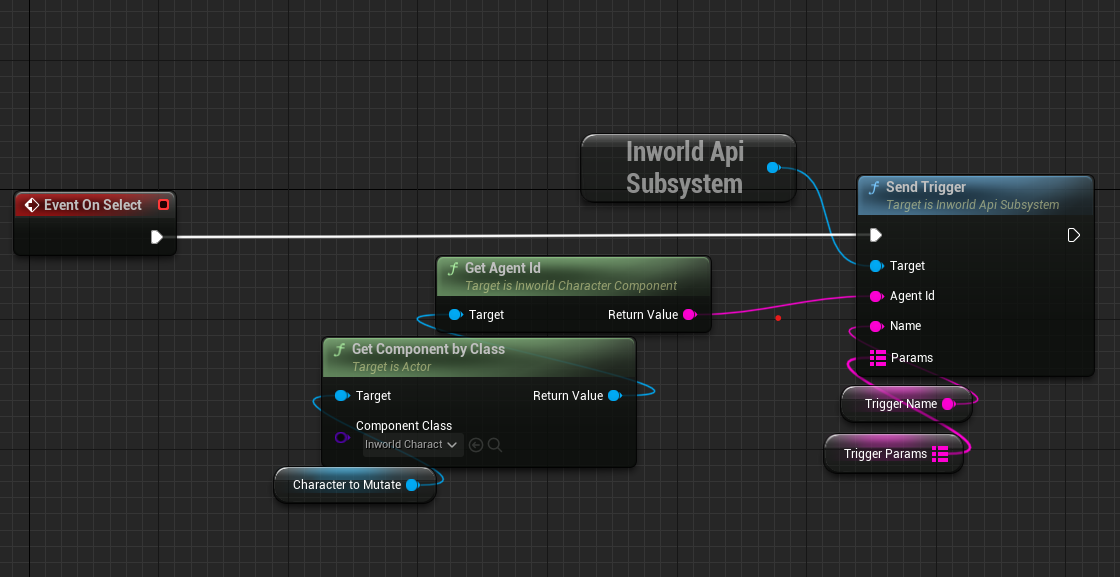
Their favorite food is sent to the robot when the BP_Select_Trigger button actor is clicked using the trigger change_food_type with a favorite_food parameter so this can be easily extended to make any food their favorite food by making more copies of this actor in Unreal.
The blueprint is relatively simple and just sends a trigger to the character.
The goal change_food_type in inworld studio uses the trigger parameter {{p.favorite_food}} to mutate the characters core description and motivation using character_changes and set_core_description and set_motivation.
  - name: "change_food_type"
    repeatable: true
    activation:
      trigger: "change_food_type"
    actions:
      - character_changes:
         set_motivation: "{character} wants to serve {{p.favorite_food}} to {player}."
         set_core_description: "Mutations Bot is a {{p.favorite_food}} fanatic. They are quick to tell {player} fun facts about {{p.favorite_food}}.{character}'s favorite food is {{p.favorite_food}}."